I firmly believe the best way to search for a new job is to email the hiring manager directly. This way, your showing your skills and knowledge directly to the hiring manager who can evaluate your suitability on the spot. Remember, we’re not only looking for active role that are being hired today, but also passive roles that a hiring manager is looking to hire, only if he can hire the right candidate.
The problem with nearly all other job search strategies is that you’re relying on someone else to think your the right candidate, before the hiring manager views your CV. As an example, when you apply to a job advert online, firstly your CV needs to get passed an applicant tracking system, then the recruiter will take a look, and finally if all approve, only then will your CV will meet the hiring manager.
Why?
If your company email is anything like mine, you’re probably receiving hundreds of emails each day. Some are relevant, others are important, but most are either spam, or where you’re being CC’ed into an email chain.
Like many professionals, I organise my emails into folders, and most importantly, any free email programs such as Gmail and Hotmail are automatically directed into a folder in my email box. I go through mine when I have time, but I know a lot of hiring managers that don’t open this folder very often.
The way around this problem, is to set yourself up with a professional domain. This means your hiring managers email box thinks its a business email and puts it straight into their main email box.
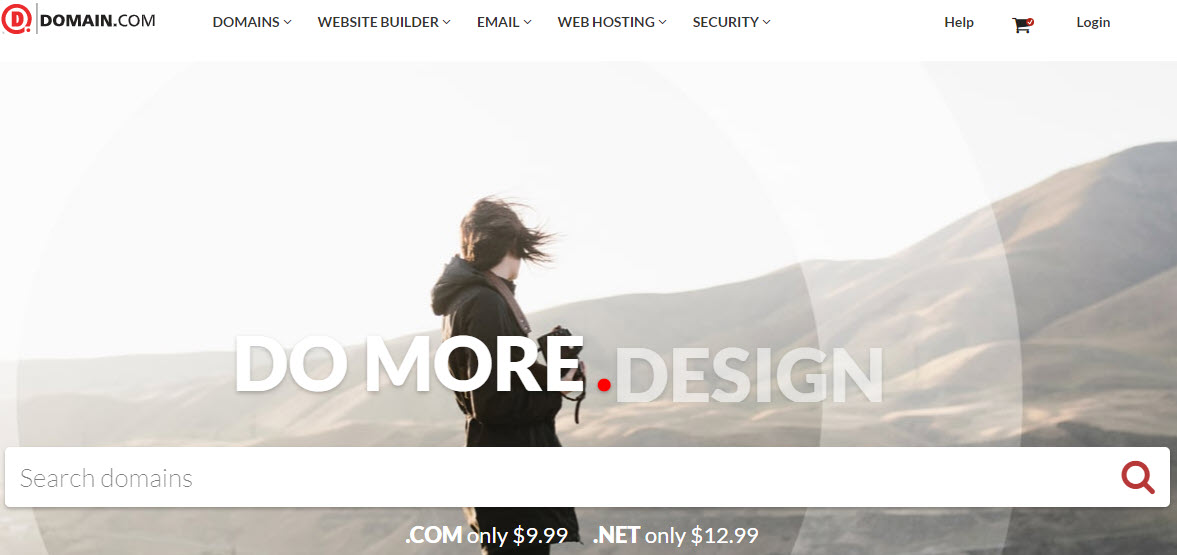
Domain.com
I’m going to use Domain.com for my professional email address. Domain.com was originally setup in 1998 and provides domain names and website hosting for over 1.5-Million websites across the world. Not only are they one of the biggest and oldest domain providers in the world today, but they provide a great service at a great price.
I have been using Domain.com for the last ten years and never had a problem. What I like most, if you’re ever stuck, they have a live chat that will point you in the right direction. Within Domain.com, you have a choice of G-Suite and Microsoft 365.
Personally, I’m going to use G-Suite as its easier use, and works better with a few programs that I want to use to send emails to multiple hiring managers at the same time.
Step One:
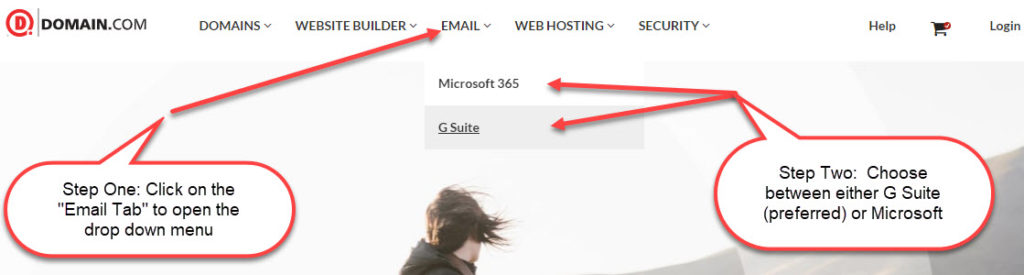
The first step is to head over to Domain.com and click on the “email” tab, followed by the “G-Suite” tab as shown below.
As discussed above, I’m going to use G-Suite for my email platform as I have used it before, I generally feel it works better and is easier to use. That said, if you prefer Microsoft-365, the instructions to set up this platform are here.
Step Two: G Suite
If you’ve chosen Google G-Suites, the below page is brought up showing you exactly what you’re buying. I chose G Suite for two reasons, firstly I know my way around it. I use google gmail for my personal email, but secondly, there are a number of programs and free software that you can install in conjunction with G Suites that will help you get your CV in front of a hiring manager. My two favorites, GMass and Boomerang.

GMass
GMass allows you to easily schedule emails for a point in the future, or send out mass emails to hiring managers. This means that you can build lists of potential hiring managers, and email you’re CV directly to all at the same time, while making each email personalised.
If you’re sending your CV to potential hiring managers, you’ll probably need to email upwards of 100-hiring managers before you start seeing results. Emailing 100 hiring managers individually is difficult, and thus GMass makes this process easier.
Boomerang
Boomerang for Gmail and G-Suite is a program that helps you to send and track those emails that you’ve sent. If you’re anything like me, you send out ten emails, start a conversation with a few, and forget the others. Boomerang helps to bring these conversations back to the top of your email account.

Step Three: Search Domain Names

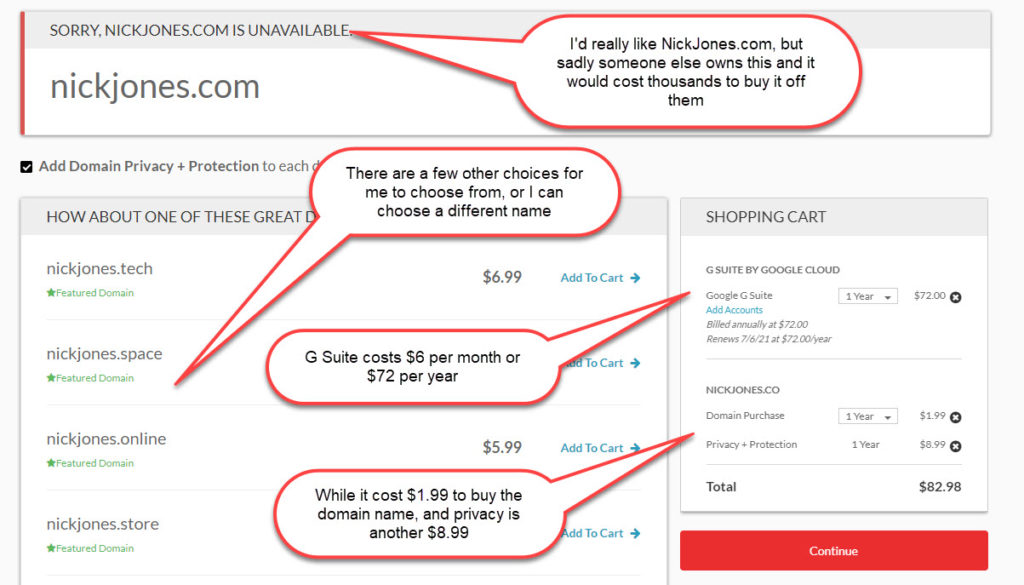
The first step is to choose your domain name. You can enter your chosen domain name in the Search for Domain Name field as shown above, to see if it available. Given the internet has existed for the last 25 years, and a domain name can only be owned by one person at a time, domain names are often not available. I really wanted to buy NickJones.com, after all it’s my name, but sadly someone else already owns it.
In this case, I can either try to work around the problem. NikkyJones is available, or I could add my initial’s to it and ue something like NickTJones.com. In the end, I decided on NickJones.co.
Names
It’s your choice as to your email address, but make sure you keep it professional. Remember, this domain name is going to your email address, and potentially, your online CV.
Personally, I like using FirstName & LastName as my email address if at all possible, but if you have a very common name, often the domain name is not available. In this case, you may need to get inventive to find a suitable domain name. Its a great idea to add initials and middle names, but I would stay away from dates. NickJones2020 is available, but I’m not sure how it looks in 20 years time.
Finally, remember, this is a professional email address to show that you’re a professional personal. ILikeBeer, Partyman1998, and anything sexist, racist or even ageist are not professional and will count against you.
TLD’s
I think you should be buying a .com, but often it’s simply not possible given the limited supply of available domains. In this case its possible to look at other TLD’s such as .co.uk, .co, .live and .us.
There’s a huge list of TLD’s here, but there are a few I would stay away from including, .website, .store and .press as these type of TLD’s will not show professionalism.
Domain Name Choice
I’ve tried to buy “NickJones.com”, but its not available. Sadly, someone else already owns this domain name. There could be the option to send him and email and make an offer to buy it, but I’d prefer to look at other options.
NickJones.co
In the end, I decided to go for NickJones.co.

Step Four: Domain Add-Ons
Once you’ve chosen your domain name, press continue in the bottom right corner and head through to the Domain Name Add-Ons. In short, you can skip all these add-ons and head directly to the billing and information page, however below is a description of each them.
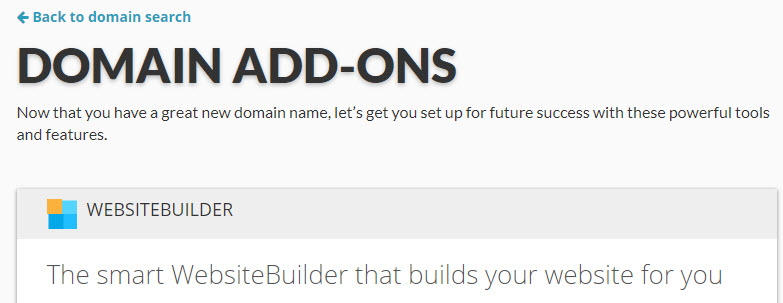
- Website Builder – This is a program that helps to build a website on your domain. It makes the whole process very easy, but it’s also expensive. An eCommerce platform will cost over $150 a year, while a simple blog costs $24. Remember, this is just for the program to build the website. You can see how I build a website for free here.
- Web-Hosting – Domain.com not only provides email addresses, but also web hosting that allows you to set up a website. The platform is both easy to use, and very reliable with a 99.9% up-time and the ability to scale to meet your needs. All plans include powerful web hosting features, a free SSL certificate, and unlimited disk space.
- Comodo SSL Certificate – An SSL certificate is a sign to your users that your website can be trusted.
- Sitelock – This is helps to protect your website from malware, hackers, and viruses. For a simple blog, its not need, however for a large eCommerce site, it’s very important.
Step Five: Billing Information
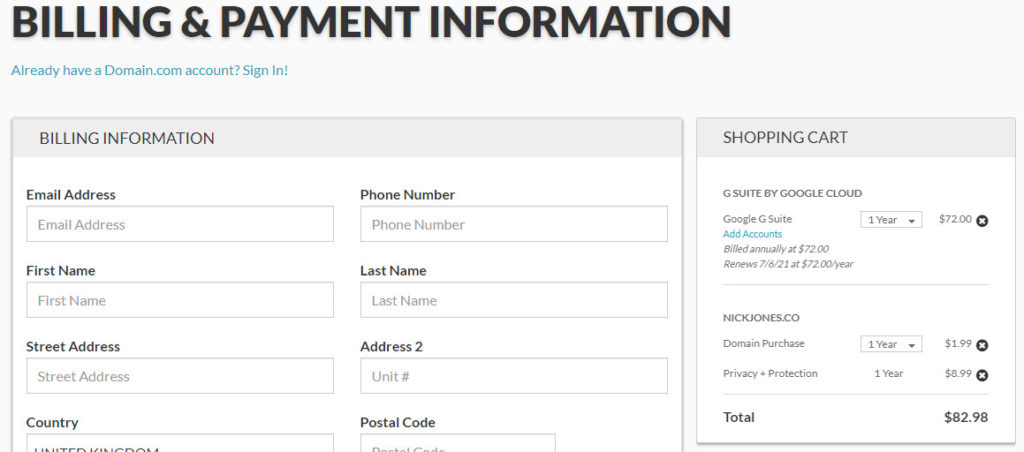
The final step is complete your billing information and pay for both your domain name and email platform. On the right side of the image below, you’ll note my shopping cart.
- G Suite by Google Cloud – My email platform is is going to be G-Suite(gmail) which cost $72 per year.
- Domain Name – My domain name is NickJones.co cost $1.99 per year
- Privacy and Protection – All domain names registered owners, have their personal details shown on the website Whois.com for the world to see. This included your name, address, email and phone number. Privacy and Protection stops this and allows you to keep your confidentiality.
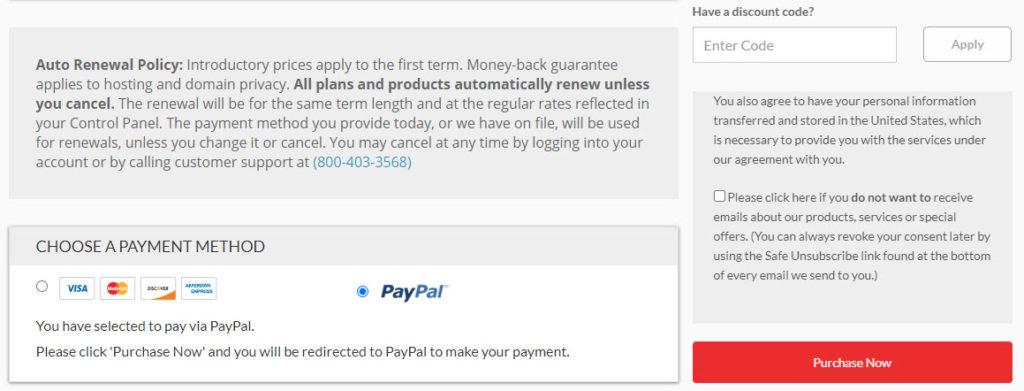
- Auto Renewal Policy – All plans are automatically renewed unless you cancel the plan through you account
- Discount Code – Is DOMAIN10 for a 10% discount.
- Payment Method – Up to you, but personally I use Paypal
- Purchase Now – To finalise your email plan.
- 30 Day Money-Back Guarantee – All plans come with a thirty day money-back guarantee allowing you to receive a full refund if you cancel within the first thirty days.
Congratulations
Congratulations, you’ve purchased your domain name and Gsuite.
You’ll receive an email with your log-in and password details, and all the instructions needed to set up your email account and get sending emails.

Step Six: Setting Up Your Email
Once you’ve purchased your email domain name, Domain.com will send you a welcome email with your invoice details, and most importantly, instructions how to get started.
Your first job is to set up your password which once complete allows you log-into your DomainName.com control panel.
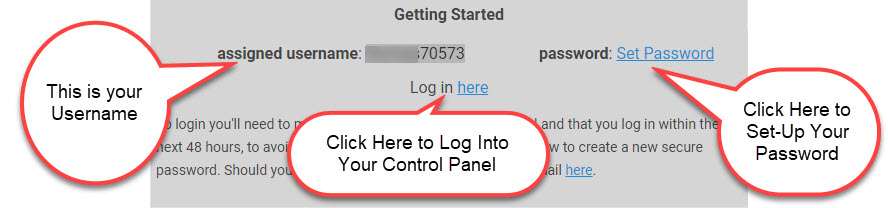
Step Seven: Log-Into Your Control Panel
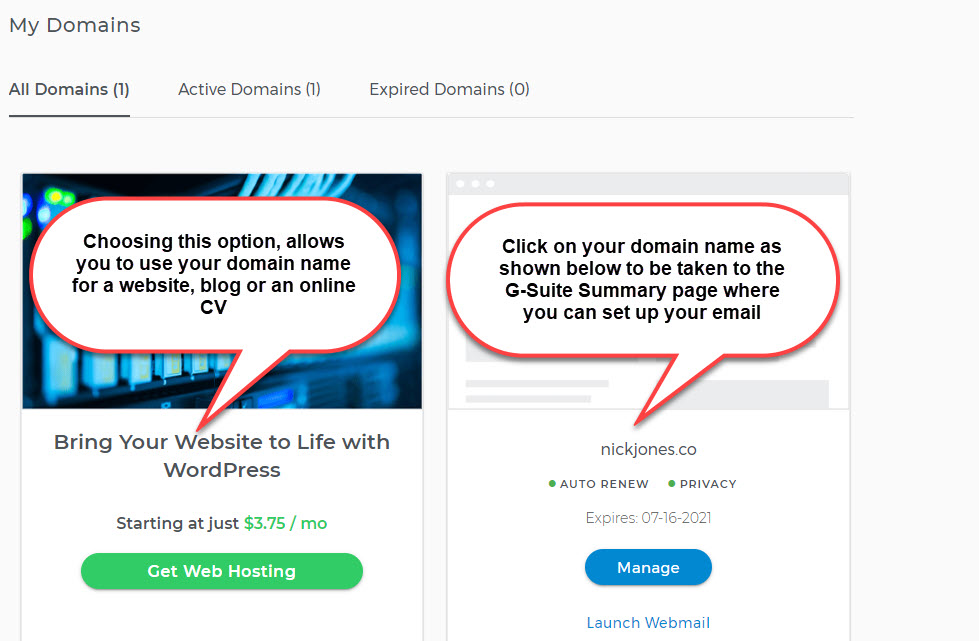
Once you’ve set up your domainname.com password, you can log into your account. Your “My Domain” homepage shows any domains that you own, and their status.
This is a new account and as result, mine shows just one domain name, NickJones.co which we just bought. If you click on the left side as shown below, you can set up your domain name as a website or a blog. If you choose the right side, you can set up your professional email.
Click On your domain name as shown below.
Step Eight: Summary Page
The below summary page contains a wealth on information to help you control your domain name, and set up your email. The short version is to click on G-Suite on the left-side summary as show in the image above.
From the summary page, click on G-Suite on the left menu.
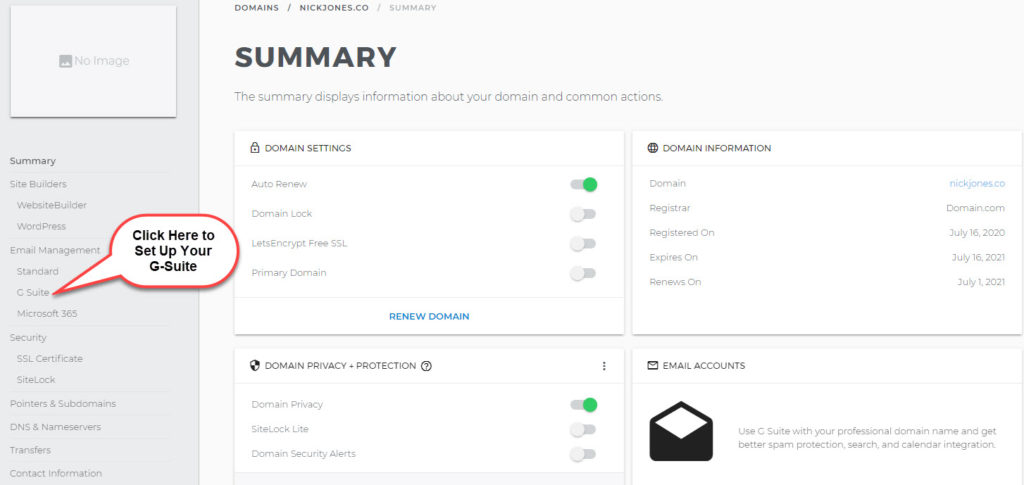
Below is an explanation of the Summary Page above;
Left Menu
- Summary Page – shows information about your domain and common actions.
- Site Builders – If you want to turn your domain name into a website or blog. You have the choice of Website-builder or WordPress. Personally I would choose WordPress as it’s very easy to use.
- Email Management – You have three choices for email, G-Suite, Microsoft 365 and a standard email. As we discussed above, I would be choosing G-Suite as its easy to use, and more importantly allow software to be used that will help you contact multiple hiring managers during your job search.
- Security – The security tab contains two options, SSL Certificates that will give your website more authority so your customers will feel more secure about their purchases, and SiteLock that helps to protect your website from malware, viruses, hackers, and spam. Both at this stage, you don’t need to set up an email.
- Pointers & Subdomains – At this stage you don’t need to worry about this section. It really controls where the information on your website is saved. Obviously, we’re not setting up a website, so don’t worry about this tab.
- DNS & NameServers – Another tab you don’t need to worry about. This tab allows you to connect your domain name to a server, that you website work correctly.
- Transfers – If you ever wanted to move your domain name away from Domain.com to another register, it’s easy to do through this tab.
- Contact Details – As the name suggests, these are your contact details for the domain.com account.
Summary Page (Middle)
- Domain Setting:
- Auto Renew – Automatically renews your domain name before it expires. (Switch it on)
- Domain Lock – Locks the domain in place. (Switch it on)
- LetsEncrypt Free SSL – makes your website secure. (Switch it on)
- Primary Domain – allows you too choose which is the primary domain name for your account.
- Domain Privacy + Protection
- Domain Privacy – Makes sure your personal details are not online. (Switch it on)
- SiteLock Lite – A basic security program to protect your domain from hackers. (Switch it on)
- Domain Security Alerts – Alerts you to any problems with the domain. (Switch it on)
- Domain Information
- Domain – This is your domain name, in my case nickjones.co
- Registrar – This is where your domain name is registered, in my case its Domain.com
- Registered On – The date you registered the domain name
- Expires On – When the domain name expires
- Renews On – The date it automatically renews
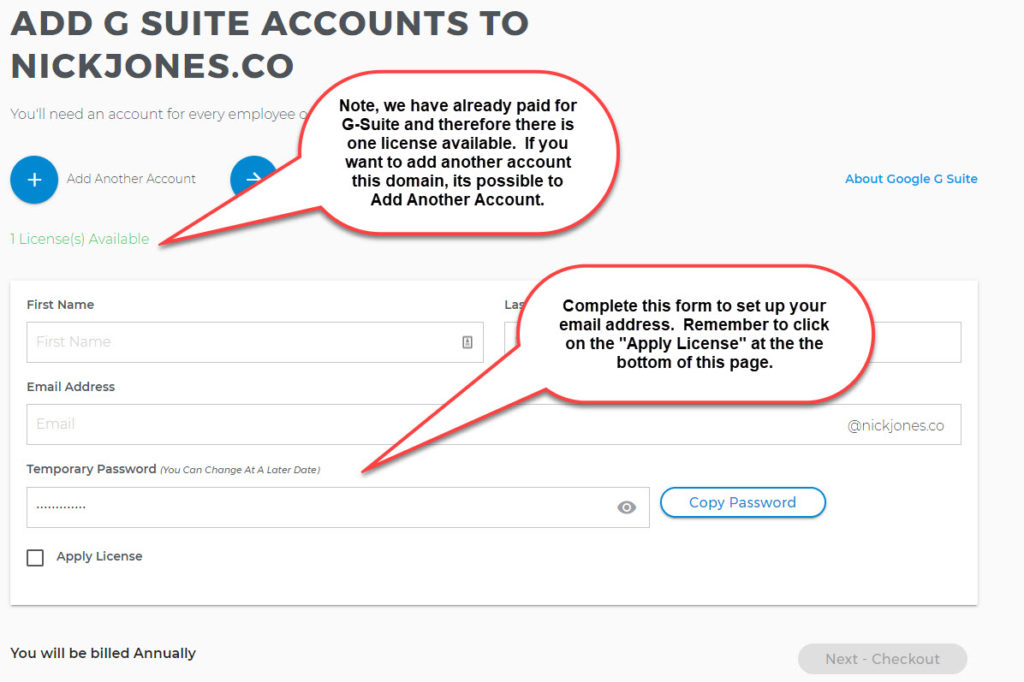
Step Nine: G-Suite
You can set up your email address as you choose, personally I’ve setup my email address as Nick@NickJones.co. The password below is your G-Suite Log-in and while it’s fixed at this stage, you can change it at a later date.
Most importantly, remember, you have already paid for one G-Suite Account. Once you’ve completed the below, click on “Apply License” at the bottom of this page.
Step Ten: G-Suite Account
As you can see below, I’ve set up my email address as Nick@NickJones.co. While you can log into Gmail simply by clicking on the “GMAIL” tab below, your first job is to verifying your account by clicking “ADMIN”.
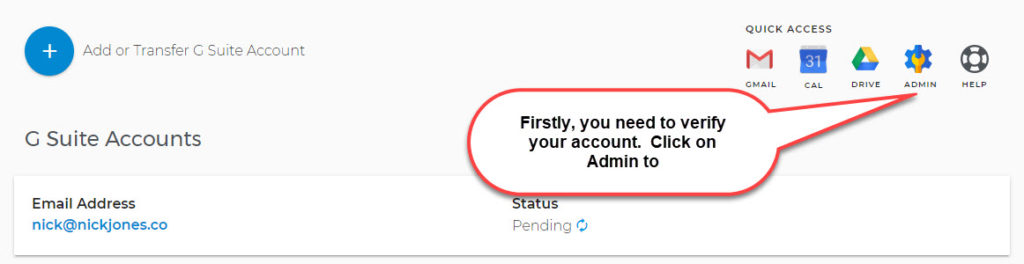
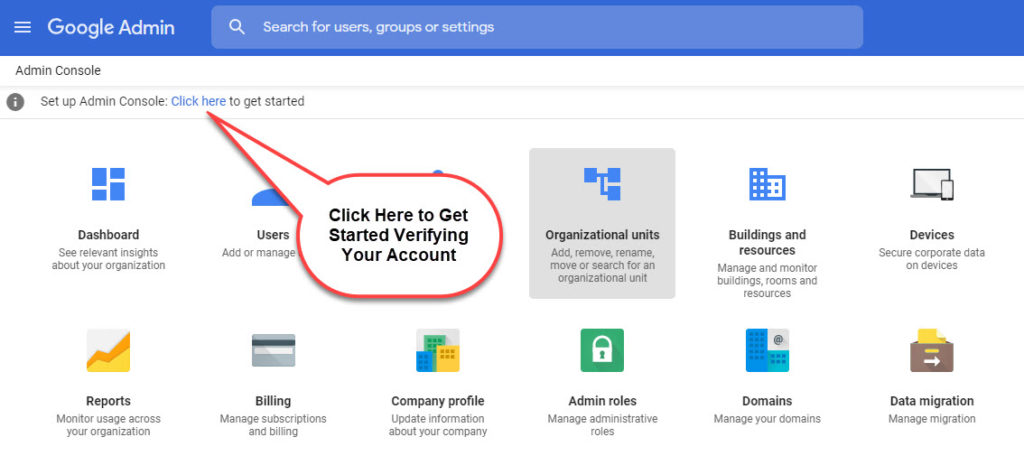
Step Eleven: Verify Your Account
Below is the Google Admin for your account and controls everything Google related. The important parts of the below are the “Users” which allows you to control everything with your email, such as resetting your password for your google account, “Domain” for that time when you want to add more domain names to your account, and “Support” for when you run into problems.
To get started, Click on “Click Here” as shown below to start verifying your Google G-Suite Account
Step Twelve: G Suite Setup Wizard
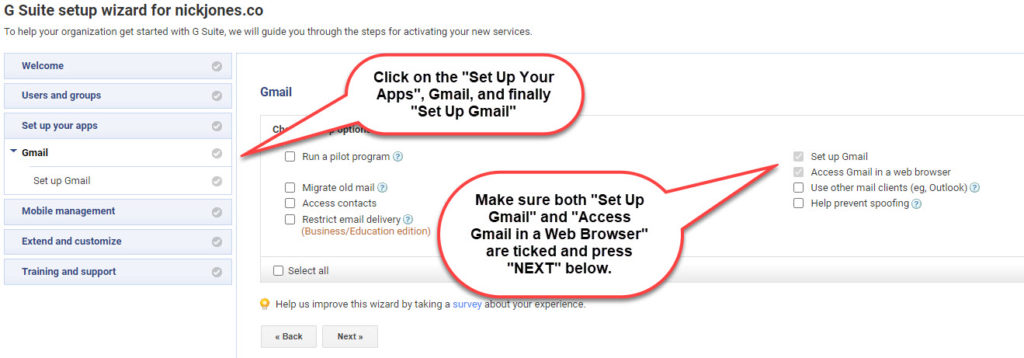
Below is the G-Suite setup wizard for NickJones.co which will guide you through the process. Eventually, I would suggest that you go through the whole thing and complete each step, however to setup your G-Suite email, we’re going to focus on the “Set Up Your Apps”Tab as shown below.
As shown below, click on “Gmail”, and make sure both “Set Up Gmail” and “Access Gmail in a web Browser” as shown below are ticked. The others do not matter at this stage.
Click Next to start the DNS Process.
Step Thirteen: Change Your DNS
This step probably looks very complicated, but honestly, it’s very easy. All we’re going to do, its verify our Google Account, and connect Google G-Suite, to our Domain.com account.
- Head over to Domain.com, and log into account.
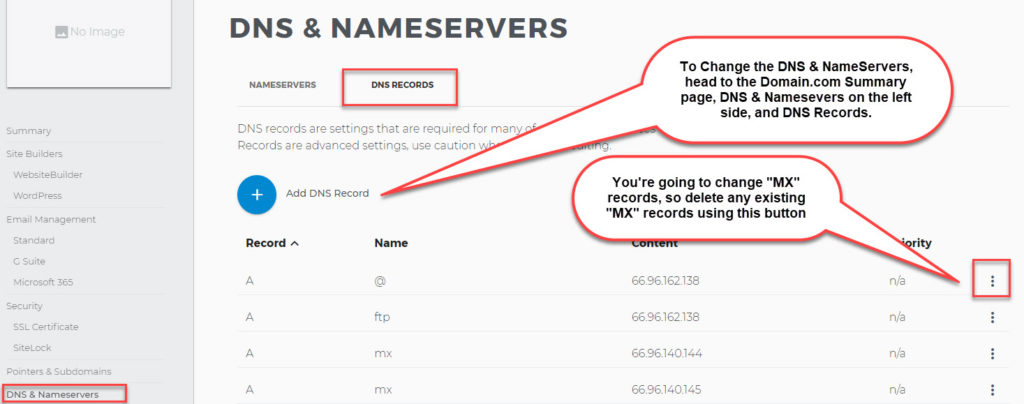
- From the Summary Page, Click on DNS & Nameservers from the “Menu” on the left. (As shown below)
- Click On DNS Records (As shown below)
- Scroll Down and look for any lines that have a “Name” or a “Record” as “MX”. In the below image, there are two lines that have a Name, as MX. Delete these records using the three dots to the right.
- Head to Step Fourteen below.
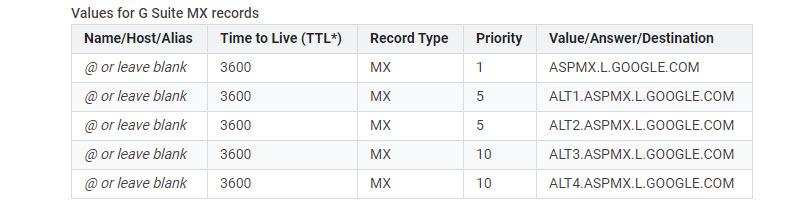
Step Fourteen: Add The Following MX Records
We now need to add the following MX records.
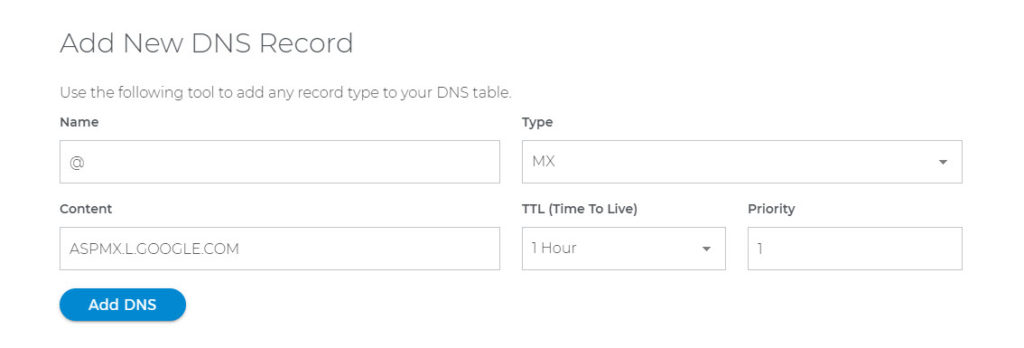
Step Fifteen – Add New DNS Record
To Add a New DNS Records, use the “Add DNS Record” as shown in Step Thirteen. You must add a minimum of two records, but ideally I would add all five records to your DNS Record.
- Name – Use the ‘@” Sign
- Type – Choose the “MX” tab
- Content – Choose the Value/Answer/Destination from the Google Image above
- TTL – Choose 1 Hour. (3600 Seconds is equal to 1 Hour)
- Priority – Choose 1, 5, 10 as per the image above
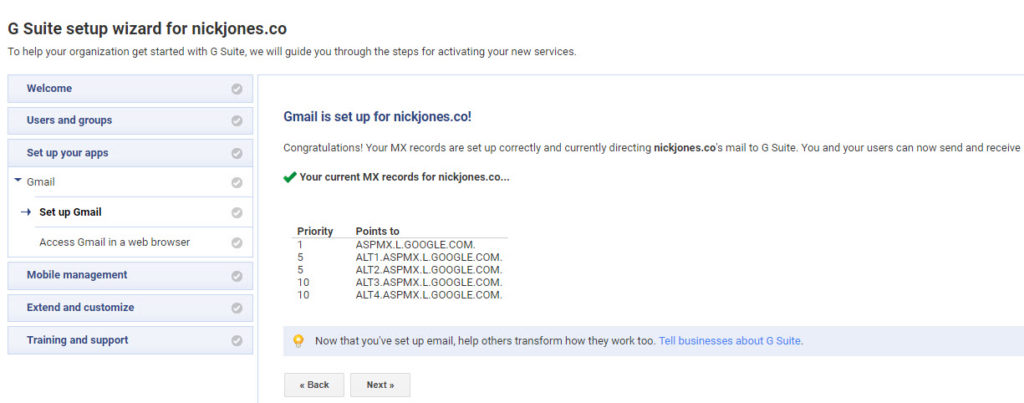
Step Sixteen: G Suite Setup
Once you’ve added all your MX records, click “Next” until you get the following message showing your MX records are set up correctly and currently directing NickJones.co’s mail to G-Suite.
Once you’ve received this message, you can log into Gmail and start sending emails.
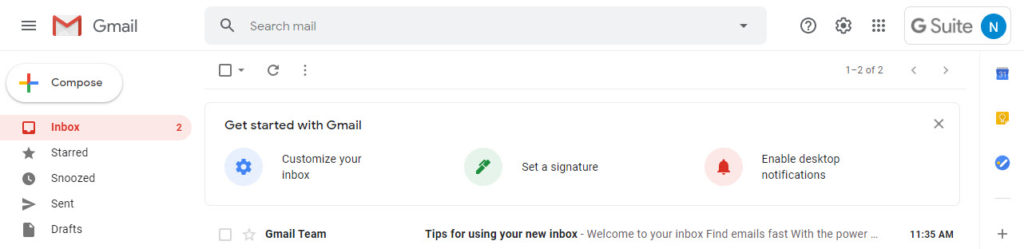
Step Seventeen: Gmail Is Set Up
Finally, head over to Google.com, click Sign-In on the right side, and log in using your email address and password from Stage Nine.
Finally
Setting up your professional email is an easy process that allows you to have your own identity on the internet.
Nick Jones
Latest posts by Nick Jones (see all)
- What Job Should I Do? It Depends on Whether You’re An Introvert Or An Extrovert - November 17, 2021
- Ten Ways to Unplug and Recharge During The Holiday Season - November 3, 2021
- 10 Jobs for Teenagers to Earn Extra Money - October 13, 2021
Perfect, this is a easy to follow
Thank you. Glad you liked it